Showing posts with label Jesse Reynolds. Show all posts

Going Salty and Trying Some New Baits

In nine days I leave for a guy's getaway to Rockport, TX. In the coastal bend of the Texas Gulf Coast, Rockport and the surrounding ports and bays have great big fish potential.

For several years we have gone to Galveston but this year, I wanted to branch out. I wanted to try some new water, some clearer water, maybe on a bay and with some green lights behind the house. We found one suited for our needs and booked it. That has been almost four months ago now and we are just nine days away.

With the many distractions of freshwater fishing in  tournaments, doing kayak demos, going to big get togethers and family time, I haven't until this week been able to really focus on what is about to go down. I have been doing some recon here and there and have talked to a few guides in the area. Going on some of their recommendations, I've purchased a few lures. Going off on my own, I have purchased a few others.

Of the new baits, there are three that I am most excited about.

The first one is a custom swimbait from Neptune Customs. These are typically made for big freshwater bass but I had Jesse outfit it with saltwater parts; I plan to swim it through the edges of the lights at night. Maybe it will work for trout, maybe it won't but I am going to try it. I'm not shy when it comes to trying new things and even out of the box things. My Neptune is in a floater gill. This is it on the rack as it is curing the top coat. It'll be here Friday most likely.

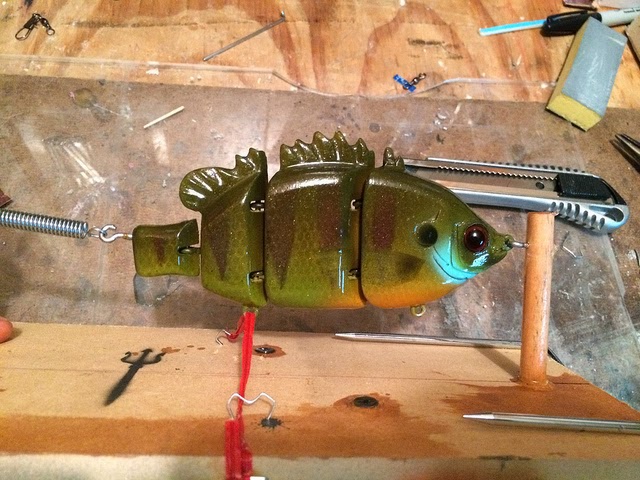
Neptune Customs 6.5" Floater Gill

The second bait is from Henry Stokes at Skinny Water Arsenal. It is an imitation shrimp that is weedless and made to swim just like a shrimp. It is a soft bait so it swims easily and the fish will hold onto it longer. I got some great advice on these from Dean Thomas at Slowride Guide Service. These are also not commercially available en mass so you have to call Dean or visit the one shop that has them. I can't wait to drag this through a drain on some tailers. 

Stoker Shrimp Tail from SWA

The third bait caught me from a rack at Cabelas. I had never seen a more realistic looking shrimp hard bait and decided it was worth a shot. This fisherman catching bait is the Yozuri Crystal 3D Shrimp. It looks amazing. We'll have to see how it works but it sure caught my attention. 

Yozuri Crystal 3D Shrimp


Maybe these will work, maybe they won't. I'll know in nine days. If you were me, what would you throw?


Installation to Application: Templates


________________________________________________________________________

Jesse Reynolds is a good friend and fellow kayak fisherman who has a passion for DIY and teaching others how to do it. He has a new page called "Installation to Application" here at paynespaddlefish.com where he will be able to bring cool rigging ideas and helpful tips to everyone. The tab for Jesse's section is up top and I will also post them as a post on the front page when they come out. Enjoy this first installment of "Installation to Application"

_______________________________________________________________________


Templates 
 by Jesse Reynolds

In this ever growing sport we all love, we’ve seen advances on most if not all aspects of Kayak Angling. One advancement I know many kayakers (myself included) enjoy are the accessories offered for tailoring a kayak to one's own preferences and style of fishing. You can look through any website that offers the vast array of aftermarket parts/accessories and be guaranteed that at some point in the past someone has said to his buddy, “you know what would be awesome? A ___ that does this___.”, or someone has spent hours in their garage bending and drilling materials in to an on the water application that suited their needs. You can also bet that those same people are the ones who made an idea or a prototype in to a reality and thus, have helped the sport grow to all of our benefit.

One such product I’d like to talk about is the Silent Traction System (STS) Kits offered at retailers such as Hook1. STS is one of the more basic accessories but none-the-less probably one of the best investments and easiest installations you can do. I mean, why would you glide up to your spot, sneaking beneath the radar only to drop your scissors or bang your rods around while getting situated? Yes STS can increase your odds tremendously but like most things, it’s not indestructible. Your standard kit comes with several precut pieces (circles and rectangles) as well as two larger pieces so you can cut your own shapes to fit your application. In my first two weeks with the STS installed I quickly learned that I was going to need more of the circle pieces that are cut to fit around your scupper holes so I saved the backing from the last pre-cut circle I had and made a template out of some thin card stock. Templates can save you time and a lot of headaches when it comes to making your cuts on STS, so we will show you how to make templates to match the factory circles and rectangles as well as a DIY radius gauge for matching the factory rounded edges on those pre-cut pieces.


Making a Radius Gauge

We will start by making our radius gauge because you will need it to make the circle pieces as well as those rounded corners we spoke about for squares/rectangles.

To make your radius gauge and templates you will need a few items commonly found around the house.

· Ruler - You will need one at least 6 inches long with a good straight edge

· Card Stock - I ripped off the back cover of a note book for this. You will want at least 6 inch lengths

· Pencil

· Small finishing nail

· Hammer

· Razor blade or Razor knife of some sort

· A small piece of fine grit sandpaper


Making the Radius Gauge

1 . Cut a strip of card stock, 1 inch wide X your desired length. 6 – 8 inches will be enough for most applications.

2 . Draw a line the length of the card stock down the middle (1/2in. from the leading edge will get your centerline for a 1in. wide piece of card stock).

3 . Measure up from the bottom edge 1in. and draw a horizontal line across the strip. This will be your pivot point for making your circles or corners.

4 . From that point, measure the distance you want to use as your radius. I suggest making marks at 1/8, 1/4, 3/8, 1/2, 3/4, 1, 1 ½, 2, & 3 inch marks.

5 . Next with your finishing nail and hammer, tap the nail through each of your measured marks on the centerline.

Note: Remember to punch the nail through just enough for a pencil or pen to slip in the hole without excessive play as you will stray off your line if this happens.

Tip: Once you’ve made your radius gauge, take a piece of notebook paper and make a mass template with all your radius markings to help gauge what the corner radius is on a precut piece of STS. Then cut it in half and you can lay that on any piece of STS to find your radius.


Making Templates

Using the Radius Gauge to make a Circle Template

To make a Circle you must divide the diameter of the circle needed by half and that is the radius you will need to use. Example: If you are making a 4 in. circle use the 2 in. mark on your gauge.

1 . Grab a piece of card stock big enough for the circle you will be making.

2 . Place your gauge on the card stock making sure that you have enough room between the edges of the material and the spacing you will need for the size circle you will be making.

3 . Insert your finishing nail in the pivot line’s hole and place it on the cardstock.

4 . Hold the nail down firmly and insert your pencil in the appropriate length hole.

5 . Simply rotate the pencil and gauge around until you complete your circle.


To make a circle to fit around a scupper hole like the stock STS kit comes with you will need to take a few extra steps.

1 . Measure the scupper hole as a starting point. As an example we will use a 4 in. circle with a hole for a 1½ in. scupper.

2 . Use the Radius Gauge and the ¾ in. marked hole to create a 1½ in. circle but do not pick up the gauge from the card stock.

3 . Knowing that we want our circle to be a 4in. diameter, use the 2in. marked hole on the radius gauge and draw your second circle.

4 . Using the 4in., outside circle, cut out your template from the cardstock.

5 . Lastly, cut out the inside scupper hole circle using a razor blade. Tip: It is easier to cut out this piece by placing the razor on the line and turning the template instead of trying to make your cut by moving your hand. By doing this you will get a nice rounded circle and a factory finished look.

6 . Take your sandpaper and lightly sand the edges clean of any burs debris.

Your finished product should look like this and should match the factory piece.


Making a Rectangle Template with Rounded Corners

Making a rectangle is simple enough but we will show you how to make the rounded corners and match the factory STS piece. The factory cut Rectangular pieces are 4 15/16 in. long X 2¾ in. wide with a ½ in. radius for the corners.

1 . Start by measuring out your rectangle to the above measurements.


2 . At each corner measure the distance of your desired radius to make a box in each corner. Remember we are using the ½ in. radius

3 . Once you’ve drawn your boxes in the corners, take the radius gauge and place the axis point on the inside corner of the box.

4 . Now draw your rounded corners with your radius gauge using the ½ in. marked hole.


5 . Now cut out your template with your scissors.

Your finished template should look like this and will match the factory pre-cut piece perfectly.


Now next time you dig your foot in as you’re setting the hook and rip through your STS in the process, you don’t have to be worried about replacing the piece because you now have a template to re-create as many as you want. I hope this has helped some of you and maybe you feel a little more empowered to start coming up with your own designs but remember… make a template first.


A Disaster Averted


This story starts like most of my stories. A guy in a kayak is fishing up a creek. The only thing is, it’s not just a story; it’s true.

During the only real cold snap that Central Texas saw this year, a few anglers found a pattern that was producing fish: the colder the weather, the better. If you were layered properly, the cold didn’t bite much and the fish would be there waiting for you. As Jesse launched that afternoon into the sub 50 degree and dropping air temps the day’s outlook was chilly but favorable. It was warmer than it had been but still cool enough that the fish should be biting and layers were necessary. The north wind was dropping the temperature but as long as he kept dry everything should be fine.

He paddled the half mile to his starting point and began seeing fish. A buddy had joined up to fish and the day was shaping up. Jesse’s friend spotted a tremendous fish lounging under a mat of vegetation near some vines and beneath some overhanging branches and called him over to try his finesse bait. This wasn’t the common four or five pound fish found in these waters but a true giant he estimated at over 10 pounds. The fish of a lifetime. He pitched his bait to the behemoth and watched her take the bait and start swimming away with it. Heart racing, mind in a fervor, he set the hook, watched the bait sail out of the fish’s mouth and entangle itself in the branches and vines seven feet overhead. Adrenaline still pumping, Jesse decided to try to untangle the mass above while balancing in his 28 inch wide kayak. It wouldn’t be an easy feat but he could do it.

Standing up seemed to be easy and he soon discovered keeping his balance would be the issue. Moving toward the bow of the kayak he steadied himself by grasping at the branches above with one hand and untangling the line in the other. In a short time he had all but one loop undone but every time he reached for it the branch it was on would sway out of the way.  Jesse knew he would have to get closer and tried to steady himself by grabbing a branch in each hand. As he made the move the kayak shifted and a shudder went through his body as his center of balance unwontedly shifted. Instinctually he released the newest branch he clung to, a two inch thick limb of trouble and tried to regain his balance. While trying this the cold, damp thoughts of falling out of the kayak seemed to be playing in slow motion simultaneously with his efforts to regain stability. The kayak started to list and he reached for the limb he had previously held. Facing the water the limb gave way and the thought of submersion was becoming a reality frame by frame as Jesse belly flopped into the water and out of his kayak.

At this point his Navy training, his preparation for re-entry, his studies of just this type of situation paid off. While the water was warmer than the air Jesse knew the timer had started. Dismissing thoughts of continuing to fish for that 10 pounder, he climbed back on his kayak. As he surveyed the deck for losses, he realized everything was still there. His lashing and leashing had paid off. Now it was time to move. Knowing the cold that would soon settle in his bones, he started paddling toward the launch at a very brisk pace taking deep breaths and focusing on the task at hand. When he cleared the mouth of the creek onto the main lake the wind cut him and the cold was seeping deeper as his fingers began to numb. Jesse had several layers including wool socks, Patagonia Capilene upper and lower base layers, ski bibs treated with a water repellant and an North Face 800 Goose Down jacket to keep him warm even in wet conditions. It wasn’t luck, it was preparation. He reached the launch, cold, numb in places not as well covered and wet. The cold air wasn’t making this easy. He remembered that you are supposed to get the wet layers off of you but he didn’t have any other clothes to change into. He decided to shed a couple of layers and it proved to be a mistake. With nothing to change into, and still wet, the cold north wind cut through him like a dagger and he began shaking. A mistake he wouldn’t make again. Jesse found a towel in his vehicle and dried off as much as possible and then let the heater do its job. When he had finally recovered from the cold he recounted what saved him that day. Preparation for just such an event by practicing and watching videos, multiple layers of good water wicking materials, and not succumbing to the temptation to stay out longer and fish were all key players that day.

We can learn some dos and don’ts from this story but most of all I hope we all take the potential threat of cold water submersion as a real one. Failing to plan is planning to fail.