Showing posts with label Paddle Fish. Show all posts

Checking Out The BlackPak


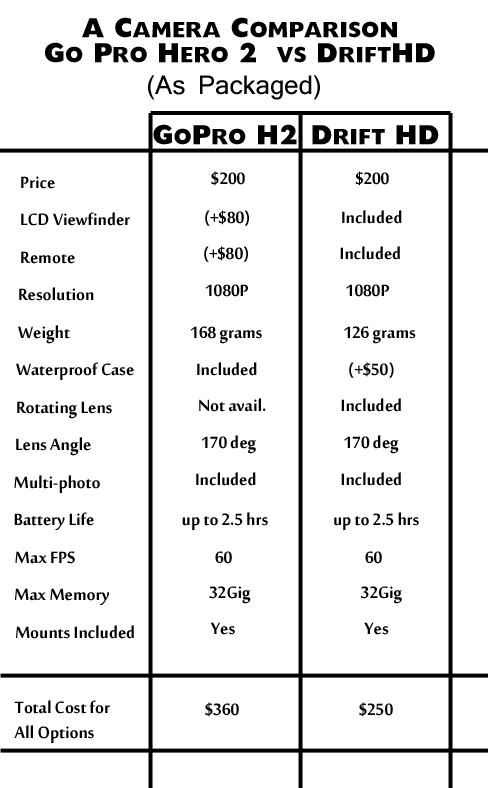
Before the gear heads start saying their amens and the frugal home DIYers start condemning a price tag, I want to implore you to read the rest of this post. I want you to understand why I bought what I did. Am I saying that everyone needs this tool? Need is a strong word. I am saying that I enjoy the heck out of mine and can’t imagine not having it. Let’s get on with it.

 On deck storage for fishing gear has historically been limited to milk crates or other tubs until recently. Late last year we started seeing teasers and eventually the final product called The BlackPak from YakAttack. A 10 year vet of using milk crates as storage on my kayak had me scratching my head about whether this new storage container for kayaks warranted an $85-$125 price tag (depending on the features you order.) I read up, made a few phone calls, watched a couple of videos about it and decided I needed one. Luckily I was able to get in on one of the first orders from HOOK1 and Chad Hoover got it sent to me post haste. 15 minutes after I received it, I had it put together. For the next couple of days I continually changed the configuration, added some LED lights and got it ready for the maiden voyage. I haven't fished without it since that first trip. 

I could spend the next 1,000 words talking about what the BlackPak can do but several of those things can be duplicated by a milk crate. As the title graphic says, "This Ain't No Milkcrate". (I realize that's a double negative so before you email me about grammatical law, relax a bit. Pulitzer isn't calling anytime soon.) 

Let's get right to the good stuff. These are the things that a BlackPak gives you that you can't get out of a milk crate. (Unless you basically mod it to be your own BlackPak) 

Enclosed protection from the elements. 
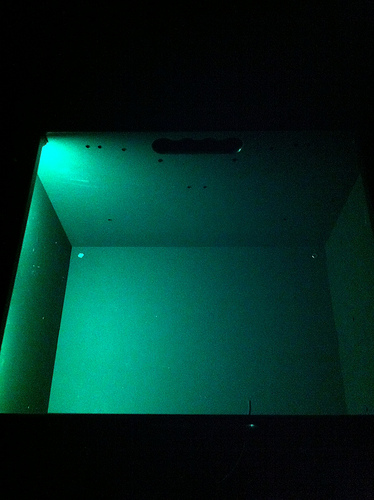
Protect those soft plastics from direct sunlight. While not water tight, the BP deflects most rain, splash and other intrusive water. If water does get in, it will quickly find the exit via the drains in the bottom corners.

Keep all your stuff enclosed.
Drop a 1/4 oz bullet weight into the BP and it'll be there when you get home. Same thing for hooks, split shot, worms, lures and more. Do the same in a milk crate and well, good luck. If you happen to have lures loose, they won't find their way out the sides, get tangled on items outside the crate pressed up against it or latch on to the many open gaps. Solid on all sides, everything stays inside but the water. 


Rigging readiness. 
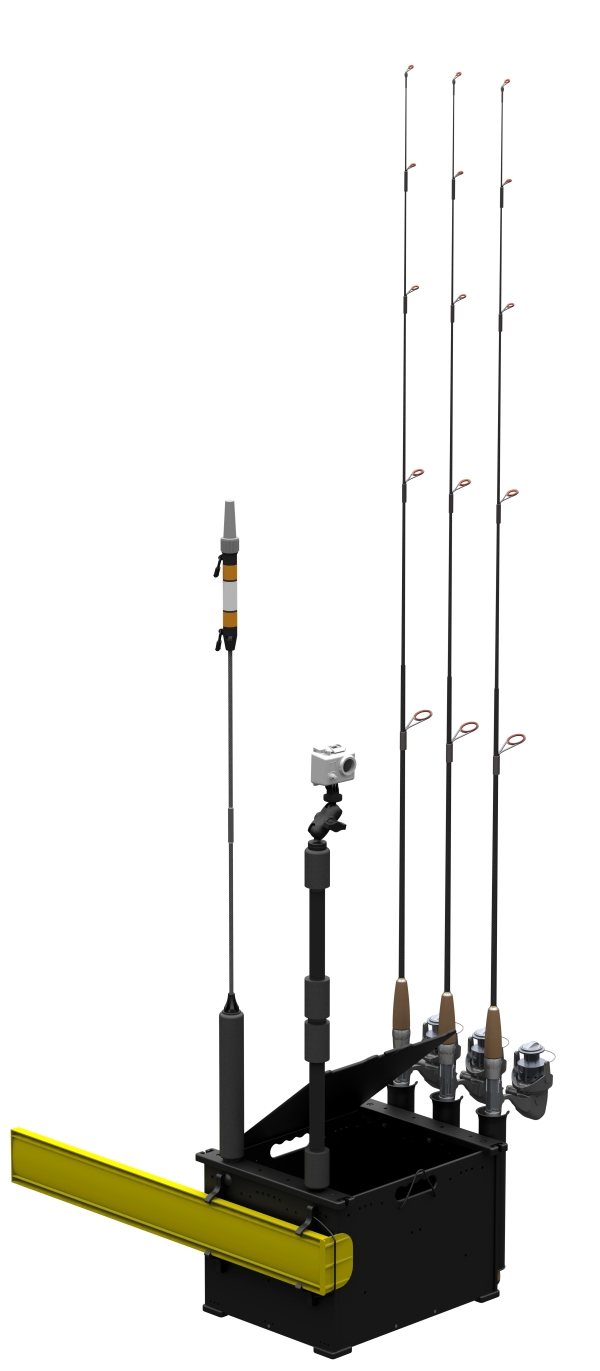
The BlackPak has top rails that are ready to add on GearTrac or rig straight to it with a long t-bolt. The top, bottom and sides are all made of very sturdy Starboard that you can mount something directly to. It is pre-drilled on both sides to attach the optional rod holders and because the lid is inset you aren't bumping rods in the rod holder. The top rail also adds a nice lip that allows you to mount LED lights under to keep them away from water, knock out direct light at night to your eyes but still illuminate the BP. I drilled a couple of additional holes and added an on/off switch. One last thing about the top rails, they come designed with hooks so that your bungee in your tank well can secure it. No need to buy additional straps, mess with stretch hooks or any of that other mess. The BP is really only limited by your imagination and fits in almost every sit on top kayak. You can also bungee it down to the back of lots of sit ins as well.  

Sturdy.
This is not a cheap plastic Tupperware box. I've seen guys over 250 pounds (262 according to the video) standing and JUMPING on the BlackPak. Chad wants to make sure it is sturdy so he tries it. Don't believe me? Go here: http://www.ustream.tv/recorded/27862020/highlight/314104
The BlackPak is super lightweight yet rugged and durable. You aren't going to find that for $4 at WalMart. 


Have you ever tried to make something like this yourself? Some guys can. When I say some, I mean very few. Most of us can zip tie some stuff together to make an enclosed box, sure, but to make it this sturdy, without exposed openings in the sides and corners, with rigging hooks and top rails and just the material alone you are going to spend a nice chunk of money. I did some rough calculations for 1 18" X 18" piece in black at 1/4" thick. That's $13.50 without shipping or taxes. Check it here: http://www.tapplastics.com/product/plastics/cut_to_size_plastic/king_starboard/526
You would need 6 of those. You'll have to find some way to do corners on your own. For purchase, shipping and taxes, just the sides of this are going to cost you $102.68. Better not mess up. That's for the basic sides. You don't have top rails, rod holders, corners, hardware, bungee etc to finish this out. For $85 you could get the base setup and come out ahead. See what I'm getting at here? You can make a copy but with the same quality components, it will cost you more and look and function much worse. You come out way ahead with the deluxe model for $125 too and did I mention it's also available in white now? 

I realize some folks don't have the money or want to spend the money and that's cool. But if you think you will duplicate the BlackPak by scrapping together some plastic around a milk crate, you should think again. Just because a wagon has four wheels doesn't mean it's a Ferrari. 

If you want to see one in person and are in the Dallas area, check out the Mariner-Sails show room. They are located at 11110 Stemmons Freeway, Dallas, TX  75229.

If you aren't in the Dallas area but are ready to order one, go here: http://kayakfishinggear.com/yakattack-blackpak.aspx


Paddle Battle

If you've been looking for a paddle for under $150, today's Paddle Battle is for you! Two candidates take the stage today that I have been paddling with for about 40 hours each. While the price is the same, these paddles offer very different features. Here is the tale of the tape:


The Aqua Bound Manta Ray Hybrid is a lighter paddle with bigger blades. Bigger blades however, do not always equate to more efficiency in the water. The abXII blades are stiff but I would not say rigid. You can curve the tip of the blade a bit. This is not unexpected as lighter paddles often have less rigidity and thickness in the blade, not always, but usually.

I liked paddling with this paddle. I used it to push off a few times from shore and it didn't snap or give too much. It did flex which gave me pause at first but I soon realized it could handle it. Paddling I felt like the water movement was good and efficiency was where I needed it to be. In the high seat position of the Native Slayer I could really reach the water and not have to concentrate on my stroke as much because the blades are so big. In the Malibu Mini-X, sitting low I was able to skim the water without having to dig and it still moved me right along. I did prefer this paddle in the higher seated positions.

The Werner SkagIt FG IM is a little heavier than the Manta Ray but is a rigid bladed paddle. The SkagIt worked amazing for pushing off, standing and paddling and many other uses. Where it lacked was in surface area. When in the Slayer, I had to concentrate harder on my paddling to make sure I was getting enough paddle surface in the water. I didn't need as much surface area but it was a retraining exercise. When in the Malibu, the low seat paddling was a breeze. You are at the perfect position for the paddle to work at its highest efficiency and can straight up move in a low seat kayak.


I liked both paddles. They both had cool ferrule features that lesser paddles just don't offer. Both had an area they shined in. For paddling an elevated seat kayak, I would recommend the Aqua Bound. For a low seat, I would get the Werner.

If I needed a paddle for both situations, I would choose the Manta Ray because almost all other things being equal, the weight is 5.25 oz less. That makes a difference on the water, especially for long trips.

The best way to choose the right paddle for you is to demo, demo ,demo. Ask a buddy to borrow his, go to a demo that a local dealer is having or even just go into the store and hold one. Making an informed decision is always the best way to go. Both of these paddles are available at Mariner-Sails in Dallas. 

LED Lights Are All The Same. Right?


Thinking about some LED lights for that kayak? Maybe even the deck, the power boat or the dock? It is important you know that not all LED lights are the same

Most of the LED lights that are sold to fishermen and even kayak fishermen are either a type 3528 or 5050. These numbers derive from the size of the chip used to run the lights. 3528 lights have a chip that is 3.5mm X 2.8mm. A 5050 is 5.0mm X 5.0mm. See where the name came from? 

As you have probably guessed by now, a 5050 is brighter in almost all scenarios when compared to a 3528. A big part of this is because the 5050 has three LED chips in one housing as compared to the one chip per housing of the 3528. 


5050 chip
3528 chip
Because of the size of the chip in a 5050, the number of LEDs per foot could be less than a 3528 but rarely is. Most companies sell 20" strips that have 30 LEDs regardless of the chip. 

Another thing to consider is the wire that is attached to the LED strips and the extra wire that may come with it. Is it marine grade? Are the connections heat shrink sealed? Is it tiny little 28 gauge wire? 22? 16? Remember the lower the number the thicker and usually more durable it is. A marine grade 20 gauge wire will outperform a non-marine grade 20 gauge wire in water applications. It may outlast a non-marine 18 or 16 too. 

LED lights typically go one of two places: inside the boat or outside the boat.
Marine grade wire on the left
The outside lights are the ones you should think about when you ponder wear and tear. How is the casing built? What adhesive is used? Is it filled with silicone, resin, nothing or is it open air? How are the ends capped? The better made case will be the one you want. 

I ordered a couple of different strips from two different companies to do a comparison. I took the best pictures I could so you could see what I am seeing during testing. Both are blue lights. One is a 5050 and the other is a 3528. Both are offered to kayak fishermen as solutions. Others exist, these were just two I had heard of and wanted to do a side by side. Some companies don't tell you which chip size you are ordering so make sure you ask!

I have used a set of 3528s on a Cobra Navigator I used to own. I bought what I thought I could afford which was about $50. Only 5 of the 6 worked out of the box. Within two months I had busted the casing on two more. They were not the greatest but they worked. I just wished they had worked longer. But for $50, what can you expect?

I recently was fishing with a friend who had installed some 5050 lights. He flipped the switch to turn them on and it was blinding. They definitely outshined the lights I had bought. In my comparisons, it wasn't hard to tell which was brighter. 

Some final thoughts. 

Do the 5050 light cost more? Yes, they do. Are they better lights? Yes and then say it one more time for emphasis.YES! 

When you start looking for LEDs, stop looking at price first and look at components first. After you are comparing apples to apples, then look at price. 

Can I recommend a place to buy 5050 lights? I sure can. The ones I saw and then tested are actually made and sold by a guy here in Texas. He is a fellow kayaker and sponsors several kayak events every year. 

For my recommendation on getting the best lights with the best components and the ones that I tested here, visit with Dez Davis of Austin, TX. To check out his full lineup of LEDs for all applications both on water and off, go to www.supernovafishinglights.com

In addition to using all of the components listed above, SuperNova LEDs use a fully enclosed plastic jacket that's injected with resin and an adhesive lined heatshrink as well.

Dez knows his stuff and can help you with whatever you need including custom lights. 

The kit I am using now is the Extreme Kayak Kit


  • 2- 28LED Light Strips, 20"
  • 2- 13LED Light Strips, 10"
  • 4- 4LED Light Strips, 4"
  • 3M Adhesion Promoter
  • 2 Switches and Waterproofing Boots
  • 8 Pieces Heat Shrink
  • 6 Wire Management Pads
  • 10 Tie Wraps
  • 5amp Fuse
  • 6' Extra 22AWG Wire
  • 1 In-line Fuse Holder

The SuperNova Kayak Kit includes 8 strips of lights for the front, rear and cabin of your kayak, which ensures ample visability of all structures at casting distance and the cabin lights give adequate worklight, and can be switched off and on as needed.
See what's out there and most important, be seen by others on the water." from SuperNova.
Hopefully these insights will help you make the right choice for you. Informed buying is smart buying, wherever you decide to buy. 

Time to get on that night bite!

Reader Tip #1- Another Use For A Buff

One of the great features of writing a blog is the conversations I get to have with folks from all over the world. I get emails, Facebook messages and Tweets every week that teach me something new, ask great questions and constantly reaffirm why I love kayaking and kayak fishing.

This week I learned something that I should have thought of but never did. When Jason Y. from Texas recommended it to me I was dumbfounded, so much so I wanted to share it this week!

For most folks in the outdoor community, a Buff is nothing new. The benefits of sun protection, some versions' bug protection and multiple use flexibility are a known quantity. Did you know what else it is good for?

Hearing.

Yes, you read that correctly.

Because of the way our ears are shaped, wind can reduce our ability to hear. Most conventional ear muffs reduce voices because of their thickness. A Buff however, is able to block out the wind but still allow sounds in.

Lots of folks who ride motorcycles use a Buff to cut wind noise. They have to deal with it everyday. On a kayak it can help in wind, even more so at night when your vision is limited, too hear boats or other things coming into your area. Want to hear what is on your six? Try a Buff. I know next time out I'll be trying mine. For the folks who don't like things on their face, this is another use for a Buff where you don't have to wear it over your nose and mouth. Wear it like a skull cap and cover your ears. It will mostly hide under a hat and leave the sunscreen guys the uncovered feel they prefer on their face.

Thanks so much Jason for the tip! 

Kayak Fishing is for Girls…Too


Trip after trip on the water I meet new faces. I talk to folks from all over the state and country about kayak fishing at shows, get togethers, informal gatherings and social situations. After talking way too much and not paying attention enough, I finally realized a lesson I learned well last week and it was driven home this
morning: Kayak fishing is for girls…too.

Kayak Fishing is for everyone. I rarely see the gentler sex on the water, fishing pole in hand doing battle with the scaled phantoms so many of us guys chase. Last weekend however, I had the privilege of fishing with Nina Kavon of Team Hobie-Finland. Nina grew up around fishing. Her family owns and she now runs a fishing shop in Finland. She can also catch bass with the best of them which she proved by winning a big bass award at the 2nd Annual Hobie Worlds last Fall. Nina has the instincts, science, and desire to be on the water that all of my kayak fishing buddies do. She’s not the first that I’ve met though. Just the most recent. A handful of female anglers have shown their prowess in our sport but it was a group of seven year olds that opened my eyes.

This morning I presented kayak fishing, the science of fishing and the motivation to work hard to accomplish dreams to an elementary school. Almost 200 kids attended my sessions and during each period, the small group was asked the same question: What do you want to be when you grow up?

Keep in mind this question was setting me up for a “work hard to accomplish your dreams” segue but four little girls sitting together stopped me cold.  Each one of them answered the question the same. “I want to be a kayak fisher.” It never dawned on me that little girls might want to do something most little boys think is cool! I have a four year old daughter and she loves kayaks but I always attributed that to osmosis. These little girls at the school had 15 minutes of hearing about the sport so many of us love and they were ready to jump in. I thought that was so cool! After mulling it over through the day today, I realized I have neglected talking about cool things that might apply to the female readers of the site. Or even the guys who care about style and design.

Today I would like to rectify that. As much as I can currently. 

Pink ConSeal and Shock Cord
Chad Hoover over at HOOK1 started to recognize this trend long before my brain cells connected and started carrying bungee (shock cord) in different colors. Most of us guys look for a cool colored boat but see the accessories as utilitarian (with a few exceptions, Walker N.) Being utilitarian, most of the kayak accessories on the market are black. Black is easy, it doesn’t get dirty quickly and has a manly Darth Vader look to it. Some of the folks out there are looking for a little more pop in their accessories and that is available more and more. The pink shock cord will add a dash of color to any kayak but looks great on a lime green kayak. It even looks good on camo! 

Chad has been working on expanding colors in not only shock cord but also sound dampening materials and clothing options. He’s helping the industry expand and listening to you ladies. Let us know what you’d like to see. Leave a comment here, on Facebook or at the HOOK1 site.

I can’t speak for Chad, but for me, you’ll get results a lot quicker if you tell me what you’d like. I’m listening now. Let me know!


Final Thoughts on the 2013 Hobie Outback


Below you will find my thoughts, the good with the bad. Being an ambassador for Mariner-Sails allows me to speak freely about kayaks regardless of brand and to offer what I feel is advice to both consumers and the manufacturers. I am very grateful for their support.

Some people may agree, some may not, but these are my thoughts.

For the last several weeks I have been field testing a 2013 Hobie Outback from Mariner-Sails in Dallas, TX. Mike from Mariner installed the rectangular hatch in front of the seat and I installed two , 4” GearTrac GT-175Rails. Other than that, no modifications were performed to this kayak. I fished in this kayak eight times, all trips were over 4 hours in length and all were recorded on video so I could go back and review.

I originally chose the Outback because of a trip to Lake Fork. I knew with March weather, it could be rough. I didn’t want to be limited by just my paddling strength and liked the thought of speed and less fatigue that the Outback represented. I needed to be able to rig it out with my fish finder, a Lowrance 5X-DSI, fit my BlackPak from YakAttack in it and past that, just be able to fish and put the kayak on top of my Ford Escape.
With all of these criteria met, I picked up the Hobie Outback in early February, rigged it out and got to fishing.

The Good

The Outback is light enough to cartop by yourself. At least for me it was. Anything under 75lbs is typically able to be put on top of a car or SUV. Some folks are stronger, have load assist bars etc and can do more but if you have a factory rack or foam blocks, 75lbs is a pretty good threshold. The Outback comes in under that. My rigged weight was 74lbs.

Though not advertised as such, you can stand and fish in this kayak. The platform is not quite developed to promote it but I stood and fished a crankbait out of this kayak with no problems. At 33 inches wide and just over 12 feet long with a tunnel hull, the Outback is very stable. I sat side saddle, stood and even disembarked by walking straight up the centerline to the bow. With increasing demand for stable, standable kayaks, this one should be on your list.

Outbacks come with a rudder already installed and have tiller steering. For those of us who brace with our feet, this is a great feature. I spent an afternoon trolling for hybrids by pedaling the Outback while enjoying a large soda. Not a lot of platforms offer hands free fishing. Another nice feature to the rudder is being able to stay on a line with the wind blowing. All rudders offer this but a tiller style is easier in the wind for us “bracers”.

Mirage Drive
The Mirage Drive comes with standard fins that are upgradable to turbo fins which are narrower and generate more power. While the option is nice, don’t think it necessary to immediately upgrade. The standard equipment will move this boat well.

The draft on the Outback is much shallower than I thought. With the fins spread I was able to fish in less than a foot of water multiple times in many conditions. If you remove the Mirage Drive, the kayak is limited only by your poling ability. I crossed over a stretch of water standing and poling the Outback at Lake Fork that was four inches deep.

The back well storage is large. I pack a lot of things when I fish. Typically, the added gear weighs another 60-80lbs. It has to go somewhere and above deck is where I like it in freshwater. I was able to store everything behind my seat and still have room for a small cooler if I wanted.

The front hatch is a nice size. While not the largest of front hatches in the market, the Outback has enough clearance to stow rods, paddles and other gear below deck. The sail post just in front of the hatch also gives easy access to install a fish finder or other accessory post if you don’t plan on sailing.

The Outback seat is not your normal seat. Usually strap in seats are flimsy and give you about a four hour max seat time before your back wants to leave the country. Not this seat. With adjustable support via air intakes (you just twist) I had no issues fishing six or eight hours without a shoreline exodus.


The Bad

These are the things I see as needing improvement for future models. Not everyone will agree but these are what I encountered.

The tunnel hull offers great stability in the water. It makes it very difficult to transport with other kayaks or by itself while upright. You cannot stay rigged when transporting this kayak. The hull causes it to lean to one side which means all of your gear will shift and your rods are at a funky angle. I suppose you could fix this with PVC, a trailer, Hydro Glide pads from Thule or something of the like but it still remains a nuisance. Lots of preplanning has to go into transport.

Straight gunwales are at a minimum. The longest GearTrac I could add to a front gunwale was four inches. This doesn’t leave a lot of room for adding accessories and made me think long and hard about where everything would have to go. A straight eight inch section of space would be nice (that’s NOT in the recessed areas by the handles).

Move the rear carrying handle already. People have complained for years that the rear carrying handle is hard to get to and covered by the rudder in the stowed position. I don’t want the rudder flopping around while I’m loading and I don’t want any more scratches and cuts from fighting the rudder while carrying the Outback. Move it to an offset position on the back and front, four inches from where it is and problem solved.

The Outback is able to be fished standing up currently but is not designed for it. Steal six inches of the back well and move the seat back to add a flatter, larger surface just in front of the seat. And while we are talking in front of the seat, make the rectangular hatch standard so you can fit a paddle and larger gear underneath.


Summary

The Hobie Outback shines as a fishing boat. It is a nice hybrid between the sleek, fast Hobie Revolution and its battle cruiser brother the Pro Angler. If you want a kayak that is able to be car topped, transported via cart easily, is versatile enough for almost any water and comes with tons of features built in, this is a great choice.  


Catching Fire in the Marketplace


Every 6-12 months a new kayak, new gadget, and new widget seems to catch fire in the retail and barter markets. The object becomes desirable and sells like crazy and then more often than not comes back down to the normal rate of sales a few months later.

Remember when everyone had to have a Native Ultimate? Remember when the Hobie Outback was THE boat? Remember the Jackson Coosa craze? Are you paying attention to the Wilderness Systems Ride craze that is going on simultaneously with the Hobie Pro Angler craze? If you said yes to one of these questions, the follow up to it is why? Why do these things “catch fire” or “sell like hotcakes”?

Malcolm Gladwell wrote a book called The Tipping Point. In it he talks about diffusion models, and three key players: Mavens, Connectors and Salespeople.Don't worry too much about the diffusion model piece.


Let's look at the three players.


Mavens are idea people. They are always thinking of new ideas, inventions, new ways to do certain tasks. I think Luther Ciphers is a great example of a maven. Luther is always pushing the envelope to do things better. He can take an idea, tweak it and give you something better. He also has the skills to make it. Often idea people are just that, full of ideas. Luther can take it from idea to merchandise with his own tool set.

Connectors get the word out. These folks seem to know everyone. If someone asks about a good plumber, they have a guy. If someone wants to know who to talk to about getting a new kayak, they have a guy. The Connector doesn't forget many folks, if any, and has great recollection of where he met someone and under what circumstance. I have often been called a Connector. I like people and like to know what they do. I can remember where I met someone even years or decades later. I have freaked people out when they have no idea who I am but I remind them we met at a party in Abilene, TX in 1997. And I can recall the house, who else was there etc. I've had to limit myself with this skill when someone doesn't remember me. It comes off stalker or uber nerd. If you need a guy for this or that, I can get you in touch with them.


Salespeople are not paid to sell in a lot of cases. They sell things without knowing it sometimes. It doesn't have to be a product; it could be an idea or thought too. These sales folks drive sales just by talking about them. Have you ever been in a room and been fired up to take action? A Salesperson just sold you on something. Motivational speakers are like this as are football coaches. Chad Hoover is a Salesman. When you watch his U-Stream videos you can see the passion. You are drawn to it like a moth to a flame. Chad breathes kayak fishing. People are attracted to his passion. How many of you went to his seminar in Dallas? Did you leave pumped up or did you feel blah? I bet it wasn't blah. 


When the three types work together, products and ideas can catch fire. The Connectors are the hubs. Chad and Luther have hubs all around the world, people referring the folks they know to HOOK1, YakAttack, Wilderness Systems, World Fishing Network, KBF and others. Usually a Connector will recommend you to look at a product or idea by a Maven and then introduce or encourage you to talk to a Salesman.

An example would be the BlackPak by YakAttack. How many of us have heard Chad talking about, Luther building and been referred to both by others?


What makes it even better is when a person with one of the types is also strong in another category. Luther and Chad both have qualities of the other two types. This can create a Perfect Storm in a selling environment.

Passion, when it meets with innovation and need (or want) drives the market. This is why it catches fire.


The Sunscreen Showdown


This weekend’s battle featured four different contestants from two different brands. Jess and I tried out two sprays and two gels in SPF 30 or 40 from Aloe Gator  and SmartShield. 

The sunscreens were applied in different places so we could differentiate. I used the Aloe Gator Gel on the back of my neck and ears and the SmartShield for my face. Jesse tried the sprays in the same manner. I retested the sprays myself on Sunday to see just because I was curious. Here are the pros and cons of each and then my overall pick.

Aloe Gator Sport Spray

This spray goes on in a pump style, is PABA free and works pretty well. It left me a little greasy for approximately ten minutes in the sun before it dried and was a bit tacky to the touch. The smell was pleasant and not overly reminiscent of rubbing alcohol. The Aloe Gator kept my skin cool for almost three hours before I could feel the heat of the sun. This is a very good product and with multiple applications could be very effective for water sports and is very water resistant. 
The manufacturer lists it as:

"This quick drying pump spray offers added UVA/UVB protection with Parsol 1789 and is fast drying. Plus it is oil free, PABA free and very water-resistant. With its convenient application it is great for sports and water activities. Add bonus, it is made with the gentle Lil' Gator formulation so it can be perfect for kids."


Aloe Gator Gel

This gel was the most frustrating of the group. Even on a 60 degree day I had to be The Incredible Hulk to get the gel started out of the tube. As I pushed more out it eventually got a little easier but I couldn't imagine my wife fighting with this product. It doesn't spread well either. It is very thick. It holds its shape after forcing it out of the tube and rubbing it in is a chore. I never felt like I was covered well enough and used copious amounts of it. This is marketed towards super active folks but you need an active gym membership to get it out of the tube. I felt greasy the whole time I had it on and wanted a shower as soon as I put it on. I'm not a fan and would not recommend this product. 
The manufacturer lists it as:

"Aloe Gator Gel has SPF 40 and is a total sunblock protection in a super waterproof gel formulation. It's the premier sports sunblock used by paddlers, climbers and outdoor enthusiasts!Waterproof up to 8-hours. The products are gentle to the skin, with no PABA or PABA Esters. Four sunscreens combine to ensure product absorbs both UVA and UVB rays."


SmartShield Gel

This gel was a little less than gel or at least what I think of as gel. It was the consistency of a melted Jell-O shot. It spread very easily and dried very quickly in less than two minutes. I could tell where I had applied it because it has a wet feeling going on which went away as soon as it dried. One of the ingredients seemed to have drawn some of the salt out of my skin as I brushed away what felt like sand and I wasn't on a beach. I did get some of it in my eye which stung just a touch and then evaporated or diluted which made it subside in less than 10 seconds. I would not recommend this for faces. It covers well but the chances of it ending up in your nose or mouth are greatly increased by its liquidity. This is a very good solution for hands, arms, backs, legs etc. I started to feel the heat of the sun after a couple of hours and did not reapply it so I could test something else. All in all, good except for faces and longevity. 

This is what the manufacturer says:

"This High-Tech SPF 30 sunscreen gel has a Cooling Alcohol base; great for people who have oily skin or acne. Aloe Vera gel is moisturizing and healing to the skin. This fragrance-free formula won't clog pores, never feels greasy and is waterproof for up to eighty minutes."


SmartShield Spray

I reapplied after a couple of hours with this product. I continued on another four hours with this applied and had no heat sensation at all. This pump, non-aerosol went on very easy, was light on the skin and had no odor I could detect. I could feel the coverage as it was applied and then it dried very rapidly in under a minute. It was a little shiny on the skin, as most are but lacked that tacky, sticky feeling most other sunscreens give, especially aerosol spray-ons. I used this again on Sunday and the same results were found. 

This is what the manufacturer says:

"Protect your skin from UV rays with a light, oil-free formula that absorbs and dries quickly- without leaving behind any greasy residue. This light, waterproof sunscreen will keep you protected with SPF 30. PABA-free. Contains aloe to soothe your skin."


Of all of these sunscreens that were tried, Jesse and I both agreed that the spray on products were superior. A hybrid between the two gels would be a nice sunscreen but neither are great for all application areas. The fast drying, non-sticky feel of the SmartShield really won me over and for the purposes of this test, was the winner. I wish they made it in an SPF60 or higher. 


Both of these brands were tested by request of Mariner-Sails of Dallas. They are available in their store or check them out on the web at www.mariner-sails.com or www.mariner-kayaks.com.


As a side note, a nice gentleman I met from Colorado at the kayak launch allowed me to try a sunscreen lotion he really loves. It is called Rocky Mountain and he has been using it for years. I tested some on my left hand and it repelled water nicely as well as keeping the sun at bay. I may look into it further. It was an SPF50 and went on better than most lotions I've tried. 


Why I'm Quitting Tournament Fishing


I think I have decided that tournaments are just not for me.

I have a great many friends who fish tournaments and I’ll fish a couple of them this year. But for me, not for everyone, but for me I just don’t think I enjoy it very much. Maybe to the onlooker it seems I don’t have a competitive drive. That couldn’t be further from the truth. I think the true reasoning is I am finally discovering balance. I think my competitiveness is what is driving me away from tournament fishing. Allow me to explain.

When I tournament fish, I can get obsessive. I pre-fish, I study maps, I make calls, I information gather and I try to find any advantage I can. That takes a lot of time. Notice how many I’s were in that statement (8)? It takes time away from my family, from my friends and something else. It takes away the joy I get from fishing. Nobody should burden themselves to the point of worry and grief. Especially not for a hobby.

I don’t want to chase a winning high. In tournaments, you rarely ever see the same guy winning every event.  If I am not winning then a stellar, memorable day on the water could leave me with questions, agony and angst. I’m not a rich man so fishing tournaments for fun is like throwing away money to do it all the time. I’d rather just buy more accessories to try out than flush $50 into a winner’s pocket. That being said I’ll be fishing two tournaments this year. The first will be at Fork on March 23. I love that lake and a lot of my good friends and my brother will be fishing it with me. I’ll have a great day regardless of final standings.

The other tournament is Kayak Wars. It’s not even a true tourney, no money is at stake and it’s at my leisure. So ok, maybe one and a half tournaments.

 I thought in January I would fish 6 or maybe 8 and it was even in my goals but I’ve had to change directions. I feel like I am more valuable at home and on the website than trying to win a couple hundred dollars.  
I enjoy being at weigh-ins at the ends of tournaments, chatting with everyone  but usually, I don’t have a great time while fishing. I can’t turn the switch off. If a prize is at stake, it’s hard to stop and enjoy the day.

What I do enjoy is fishing, trying out new things in the kayak fishing world and talking about what’s good and what’s …well, not.

Best of luck to you tourney guys out there but for 2013, I’m going to lay low, put up some Kayak Wars points when I can and try to churn out some content and product reviews. 

Water Safety for Kids


*As Spring is all but upon us, this is an important reminder I posted last summer about kids' safety on the water.


It's too easy to make a mistake.
Type II Child PFD

You're loading up the truck with a kayak or two and that little voice rings through the garage, "Daddy, can I go?" You may have planned on her asking but did you really plan on her going?
According to the CDC, 350 children die every year in boating related drownings.

How do you prevent that?
Planning properly.

It's human nature to think that would never happen to you. You can protect them. You will hold them on your lap. The water's not that deep. I'm a great swimmer.

I've heard them all. The plain and simple fact is no one plans on disaster happening to them. With a little planning, a little awareness and some ground rules, most of those 350 would be at home with their parents instead of living only through the emotional scars their parents now bare.

I know it feels like I am preaching, and maybe I am, but this is IMPORTANT.

Here are the steps I have taken and believe you should too to ensure safety for every child that gets on one of my kayaks. This may not be the end all be all list but you need to have some list of rules and know it by heart. And then, once you have the rules, don't make exceptions. Again, these are my rules, not State Law except where noted.

Any child in a kayak must have a proper life jacket on and secured properly.
Texas law states "Children under 13 years of age in or on vessels under 26 feet must wear a U.S. Coast Guard approved wearable PFD while underway."
Get a life jacket that is weight rated for the child and fits properly. A Type II is better than a Type III because it will, under most circumstances, float the child face up. PFD Types Click Here

All paddlers must go through an orientation with the boat. 
It only takes a few minutes but it is important to know safety on the kayak, regardless of age, but children especially need to know what to do.

Open water re-entry experiences are a must. 
The first time I took my eight year old out with me I explained what we were going to do. I said we would jump off the kayak into the water. I instructed him to stay where he was. I reminded him the life jacket will float him and I would come to him once I re-entered the kayak. I was probably over explaining things but he understood. We jumped off and he did great. He watched to make sure he didn't get run over by the kayak. When it got too near him he pushed himself away while I got back on. I scooped him up and he did great! He didn't panic. I had explained everything. Paddling back to the shore I purposefully dug in and flipped the boat without telling him. I watched him calm himself down quickly and take in the surroundings. He assessed the situation. He showed me he was ok and waited for me to get back on the kayak and scoop him up. Another success. You have to do this with your kids. You have to learn how to coach them when on the water. This is how people survive bad situations. Preparation. 

This all takes some time and preparation but if it saves just one life next year that is one more child who gets to become an adult. One more set of parents who aren't grieving over a simple mistake. Take the time to be ready for when that little girl or boy asks to do what you are doing. When they ask to go kayak with you, have a life jacket, have a plan and have a blast making memories that will last forever. 

Safety is More Than Just a Life Jacket


It was chilly that morning. Temperatures had just topped 40 degrees and the North wind was whipping at 15-20 mph. I had gloves on, a cold weather hat, three layers, wool socks and my bibs. I was determined to shoot some test footage with the two cameras I had in tow and wanted to get some time on the water and in my haste had hurried. As I unloaded the boat I went down my mental checklist and had my whistle, my PFD, my paddle, the Mirage Drive, pretty much everything but the kitchen sink. The sun was coming out and I had high hopes it would warm up soon as I shoved off and began a great day on the water. 

Fast forward four hours and I was beaching the Hobie Outback and envisioning the footage I had shot. I backed down the ramp to load up and felt an itch on my nose. I scratched it and my face lit on fire! A glance into the mirror reminded me of what I forgot. Sunscreen. 

I have been a big advocate of SPF 80+ for several years and had been on a three year streak of no sunburns. The end of my nose is a thin venous covering because of the years of damage I did in my 20s. Skin cancer is less likely an if but more of a when for me. I am trying to do everything I can but this English nose hides under few caps and without sunscreen it burns. 

I think my fatal flaw was not writing down a list. A mental checklist is only as good as the next distraction. Sunscreen didn't cross my mind because it was cold. That's stupid looking back on it. It's sunscreen, not heat screen. It is the light and reflection of light that chars me, not the presence of warmth. The sun reminded me of that. 

5 days later I am still dealing with the unsightly reminder of my blunder. Please remember to either sunscreen up before every trip or wear an item like a face Buff to protect you. A big wide brimmed hat can also help but is often left behind on a very windy day. 

The action you take today can yield better results down the road. Skin cancer is no joke. Safety is more than just a life jacket. Protect yourself out there. 

Side by Side Test: GoProHero2 vs DriftHD INDOORS

This is the first test. It was an indoor lighting test. I used the default settings and did not change exposures or other settings. I did set resolution on both cameras to 720p and 60FPS. I will be shooting the outdoor lighting test later this week. This is a very simple side by side. As a frame of reference, the GoPro is almost dead on with color, a touch over exposed but much more accurate.


A Camera Comparison: Go Pro 2 vs Drift HD

For the last year I have shot all of my video on GoPro cameras. It's what I knew, had an opportunity to buy and thought was the best out there. Last week I was introduced to a camera that I wasn't even really aware existed. That camera is the Drift HD. Aris at Mariner-Sails showed them to me in his store and it got my curiosity up. Being a numbers and checklist kind of guy, I wanted to look at them side by side. I have one now and will be comparing over the next few weeks with some side by side video but I couldn't wait to get started. My impatience resulted in a comparison list and that is what I want to present as food for thought before the field tests are in. 

The comparison below is from the specs listed on each of the respective websites. It is also as they come packaged. If additional accessories are available the price is listed in the column. Without further ado:


The results surprised me too. Save the lack of a waterproof case, the Drift HD is, on paper, the superior camera. The Drift HD has better features out of the box for less overall money. The puzzling thing to me is why Mariner-Sails still has a few left. Originally priced at $299, you can pick one up for $200 today. 

From everything I have read and videos I have seen, the field test will show equal footage if not better from the Drift. Drift has a new camera out, The Ghost, that has additional options that mark it as equal or better than the GoPro 3. I'll report back on that one in  a few months. 

If you need an action camera for your adventures, call or get to Mariner-Sails today and pick up a DriftHD.


Installation to Application: Templates


________________________________________________________________________

Jesse Reynolds is a good friend and fellow kayak fisherman who has a passion for DIY and teaching others how to do it. He has a new page called "Installation to Application" here at paynespaddlefish.com where he will be able to bring cool rigging ideas and helpful tips to everyone. The tab for Jesse's section is up top and I will also post them as a post on the front page when they come out. Enjoy this first installment of "Installation to Application"

_______________________________________________________________________


Templates 
 by Jesse Reynolds

In this ever growing sport we all love, we’ve seen advances on most if not all aspects of Kayak Angling. One advancement I know many kayakers (myself included) enjoy are the accessories offered for tailoring a kayak to one's own preferences and style of fishing. You can look through any website that offers the vast array of aftermarket parts/accessories and be guaranteed that at some point in the past someone has said to his buddy, “you know what would be awesome? A ___ that does this___.”, or someone has spent hours in their garage bending and drilling materials in to an on the water application that suited their needs. You can also bet that those same people are the ones who made an idea or a prototype in to a reality and thus, have helped the sport grow to all of our benefit.

One such product I’d like to talk about is the Silent Traction System (STS) Kits offered at retailers such as Hook1. STS is one of the more basic accessories but none-the-less probably one of the best investments and easiest installations you can do. I mean, why would you glide up to your spot, sneaking beneath the radar only to drop your scissors or bang your rods around while getting situated? Yes STS can increase your odds tremendously but like most things, it’s not indestructible. Your standard kit comes with several precut pieces (circles and rectangles) as well as two larger pieces so you can cut your own shapes to fit your application. In my first two weeks with the STS installed I quickly learned that I was going to need more of the circle pieces that are cut to fit around your scupper holes so I saved the backing from the last pre-cut circle I had and made a template out of some thin card stock. Templates can save you time and a lot of headaches when it comes to making your cuts on STS, so we will show you how to make templates to match the factory circles and rectangles as well as a DIY radius gauge for matching the factory rounded edges on those pre-cut pieces.


Making a Radius Gauge

We will start by making our radius gauge because you will need it to make the circle pieces as well as those rounded corners we spoke about for squares/rectangles.

To make your radius gauge and templates you will need a few items commonly found around the house.

· Ruler - You will need one at least 6 inches long with a good straight edge

· Card Stock - I ripped off the back cover of a note book for this. You will want at least 6 inch lengths

· Pencil

· Small finishing nail

· Hammer

· Razor blade or Razor knife of some sort

· A small piece of fine grit sandpaper


Making the Radius Gauge

1 . Cut a strip of card stock, 1 inch wide X your desired length. 6 – 8 inches will be enough for most applications.

2 . Draw a line the length of the card stock down the middle (1/2in. from the leading edge will get your centerline for a 1in. wide piece of card stock).

3 . Measure up from the bottom edge 1in. and draw a horizontal line across the strip. This will be your pivot point for making your circles or corners.

4 . From that point, measure the distance you want to use as your radius. I suggest making marks at 1/8, 1/4, 3/8, 1/2, 3/4, 1, 1 ½, 2, & 3 inch marks.

5 . Next with your finishing nail and hammer, tap the nail through each of your measured marks on the centerline.

Note: Remember to punch the nail through just enough for a pencil or pen to slip in the hole without excessive play as you will stray off your line if this happens.

Tip: Once you’ve made your radius gauge, take a piece of notebook paper and make a mass template with all your radius markings to help gauge what the corner radius is on a precut piece of STS. Then cut it in half and you can lay that on any piece of STS to find your radius.


Making Templates

Using the Radius Gauge to make a Circle Template

To make a Circle you must divide the diameter of the circle needed by half and that is the radius you will need to use. Example: If you are making a 4 in. circle use the 2 in. mark on your gauge.

1 . Grab a piece of card stock big enough for the circle you will be making.

2 . Place your gauge on the card stock making sure that you have enough room between the edges of the material and the spacing you will need for the size circle you will be making.

3 . Insert your finishing nail in the pivot line’s hole and place it on the cardstock.

4 . Hold the nail down firmly and insert your pencil in the appropriate length hole.

5 . Simply rotate the pencil and gauge around until you complete your circle.


To make a circle to fit around a scupper hole like the stock STS kit comes with you will need to take a few extra steps.

1 . Measure the scupper hole as a starting point. As an example we will use a 4 in. circle with a hole for a 1½ in. scupper.

2 . Use the Radius Gauge and the ¾ in. marked hole to create a 1½ in. circle but do not pick up the gauge from the card stock.

3 . Knowing that we want our circle to be a 4in. diameter, use the 2in. marked hole on the radius gauge and draw your second circle.

4 . Using the 4in., outside circle, cut out your template from the cardstock.

5 . Lastly, cut out the inside scupper hole circle using a razor blade. Tip: It is easier to cut out this piece by placing the razor on the line and turning the template instead of trying to make your cut by moving your hand. By doing this you will get a nice rounded circle and a factory finished look.

6 . Take your sandpaper and lightly sand the edges clean of any burs debris.

Your finished product should look like this and should match the factory piece.


Making a Rectangle Template with Rounded Corners

Making a rectangle is simple enough but we will show you how to make the rounded corners and match the factory STS piece. The factory cut Rectangular pieces are 4 15/16 in. long X 2¾ in. wide with a ½ in. radius for the corners.

1 . Start by measuring out your rectangle to the above measurements.


2 . At each corner measure the distance of your desired radius to make a box in each corner. Remember we are using the ½ in. radius

3 . Once you’ve drawn your boxes in the corners, take the radius gauge and place the axis point on the inside corner of the box.

4 . Now draw your rounded corners with your radius gauge using the ½ in. marked hole.


5 . Now cut out your template with your scissors.

Your finished template should look like this and will match the factory pre-cut piece perfectly.


Now next time you dig your foot in as you’re setting the hook and rip through your STS in the process, you don’t have to be worried about replacing the piece because you now have a template to re-create as many as you want. I hope this has helped some of you and maybe you feel a little more empowered to start coming up with your own designs but remember… make a template first.